
Hey folks!
In this guide I'll show a process of painting battle-damaged armor on vehicles and troops, which is a frequent subject in various sci-fi settings.
The process itself relies heavily on stippling/drybrushing hybrid technique, and further more manual detailing (shading, highlighting, and various battle damage techniques). General idea is mimicking the look that can be achieved with an airbrush. I would still recommend investing in one, as even basecoating and varnishing are very useful on bigger scale (larger models or large counts of them) projects.

Notes about drybrushing:
1. It picks texture up very well, so good miniature preparation (clean up & assembly, priming) is essential.
2. It is obviously a rather messy technique, plan your painting stages accordingly (do it first, if possible) and use appropriately sized brush.
3. Speaking of brushes, very important to clean them thoroughly after each use, or even keep separate ones assigned for different colors; for example, I don't use the same one for drybrushing red and light colors (which then can often turn pinkish). Your experience may be different, of course, but with brushes I use (cheap synthetic ones) no matter how well they are cleaned - bristles remain a bit "stained".
And, as with all my tutorials, aim is to not teach how to achieve "ultra-realistic" results, so interpret everything as a showcase of my "artistic representation". Using reference and logic is helpful, but I personally don't stress over it on a sci-fi model - leave that to historical scale modellers :)

Example of what can be done with the process.

There will also be a "tabletop level" version rundown at the end, showing how to paint armor like on this Primaris Ultramarine.

Now, onto the step-by-step itself. I've picked yellow (Imperial Fists), so here are colors used.

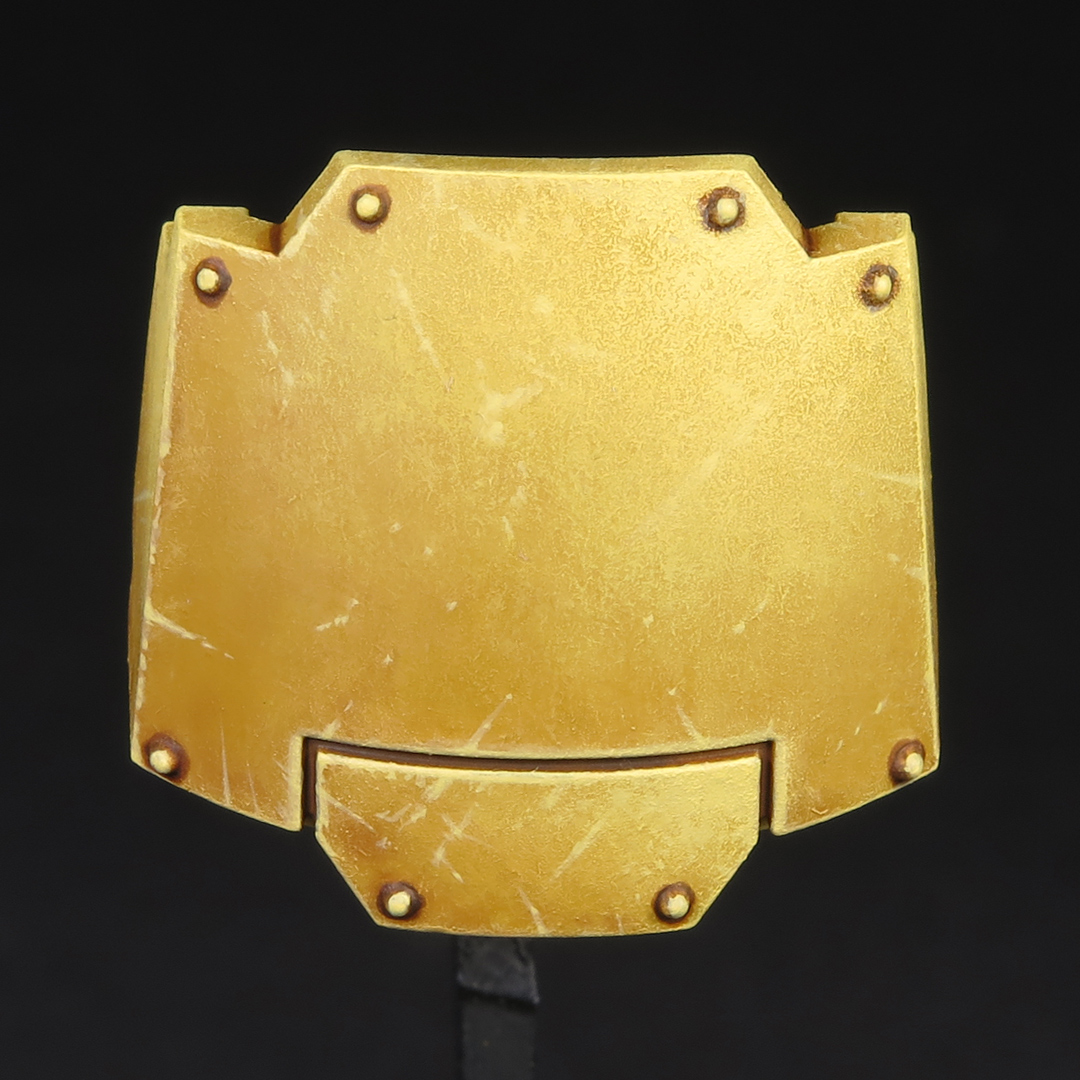
0. Tutorial bit - Primaris Redemptor Dreadnought shoulder pad. Primed with grey.

1. Undercoat/basecoat. Heavy Goldbrown. A lot of thin coats.
Meaning behind terminology is often artist-dependent, so I think it's worth explaining: to me, "undercoat" is something that's used to help eventual "basecoat", the main color, cover better. In this particular case, this step can be interpreted either way.

Goal here is to achieve a smooth-looking, but textured transition. I view this color as the true basecoat, so the previous step acts as a shadowed area. Difference in color shouldn't be stark, as the goal is to not get obvious chalkiness.

Here is a quick exaggerated demonstration of stippling/drybrushing (I don't have proper filming setup, so apologies for the lack of quality).
At first, stipple some color on "highlight end" of eventual transition (raised areas on more 3D details), then, as the brush has less paint, start to almost buff the color in with circular motion, ending near the "shadow end". Brush preparation requires removing some paint on tissue/paper towel, but stipples should leave a nice "wet" pattern without pushing the brush too hard. Obviously, things like this are hard to explain with text, but after some tries I think what works and what doesn't will become apparent.
If there are any sharp edges, you can drybrush them too.
On separate armor panels, you can do what scale modelers, I think, call "color modulation": basically, individual light-dark transitions on each panel, as opposed to a general one for the whole plain/surface, to boost the contrast and interest - I also did the transition from corner to corner, with the same reasoning in mind.
Note about light source: if the pad was to be eventually attached to the actual
Dreadnought, it should've been done light-to-dark as left-to-right, as
light source from the front would make more sense and pad would be on
the left side of the vehicle.

3. Second stipple/drybrush highlight. Pale Yellow (without cleaning the brush).
Same idea, less area - now we are creating the transition with the previous step. For edges, only drybrush upturned ones and sharpest corners.
As you can see, it looks a bit rough (hence, "battle-damaged armor"), but the final look will get cleaned and sharpened up in subsequent stages.

4. Shadow glaze; recess wash. Reikland Fleshshade + Glaze Medium + water mix (about 1:1:1); neat RF.
I think GW's Lahmian or Contrast Medium should work too.
Apply the glaze mix towards the shadow, as the pigment accumulates the most at the point where brush leaves the surface. Reason for adding medium is it slows the drying time, so you can lightly feather the edge to avoid getting any obvious sharp stain marks (having another damp brush ready to do that is useful), as well as weakens the darkening effect.
I did 2 passes here. Smooth blend wasn't the aim, as it would be pointless in the context of drybrushed highlights, but, as you can see, it is not super patchy either.
For recess shade, use neat shade and fill any panel lines & outline any rivets/adjacent details.
Both can also be done with normal paint, I'd then also add water to the mix. I just happen to like the color of the RF.

5. Stronger recess wash (dark lining). Charred Brown.
Same as before, only here we're using thinned normal paint. You can skip this, or do a second pass with Reikland or Agrax Earthshade.
6. First manual surface/edge highlight. Pale Yellow.
I've picked out the edges, and did some surface scratches & blemishes. This step is meant to sharpen the highlights, established with stippling/drybrusing - in my opinion, it helps to mask the chalkiness, and gives the paint job a bit more sophisticated/"professional" look.

7. Second manual surface/edge highlight. Ice Yellow.
Same as before, only now we're operating within previously established highlights. Pick out the upturned edges and more prominent corners & scratches.
I also added a touch more Reikland into shadowed areas.

8. Spot highlight. Off White.
Essentially dots on most prominent edges and scratches.
Tutorial is titled "battle-damaged armor", but I'd consider the following steps & techniques as optional. The textured nature of stippling/drybrushing gives a hint of wear & tear, and you might prefer that cleaner look.
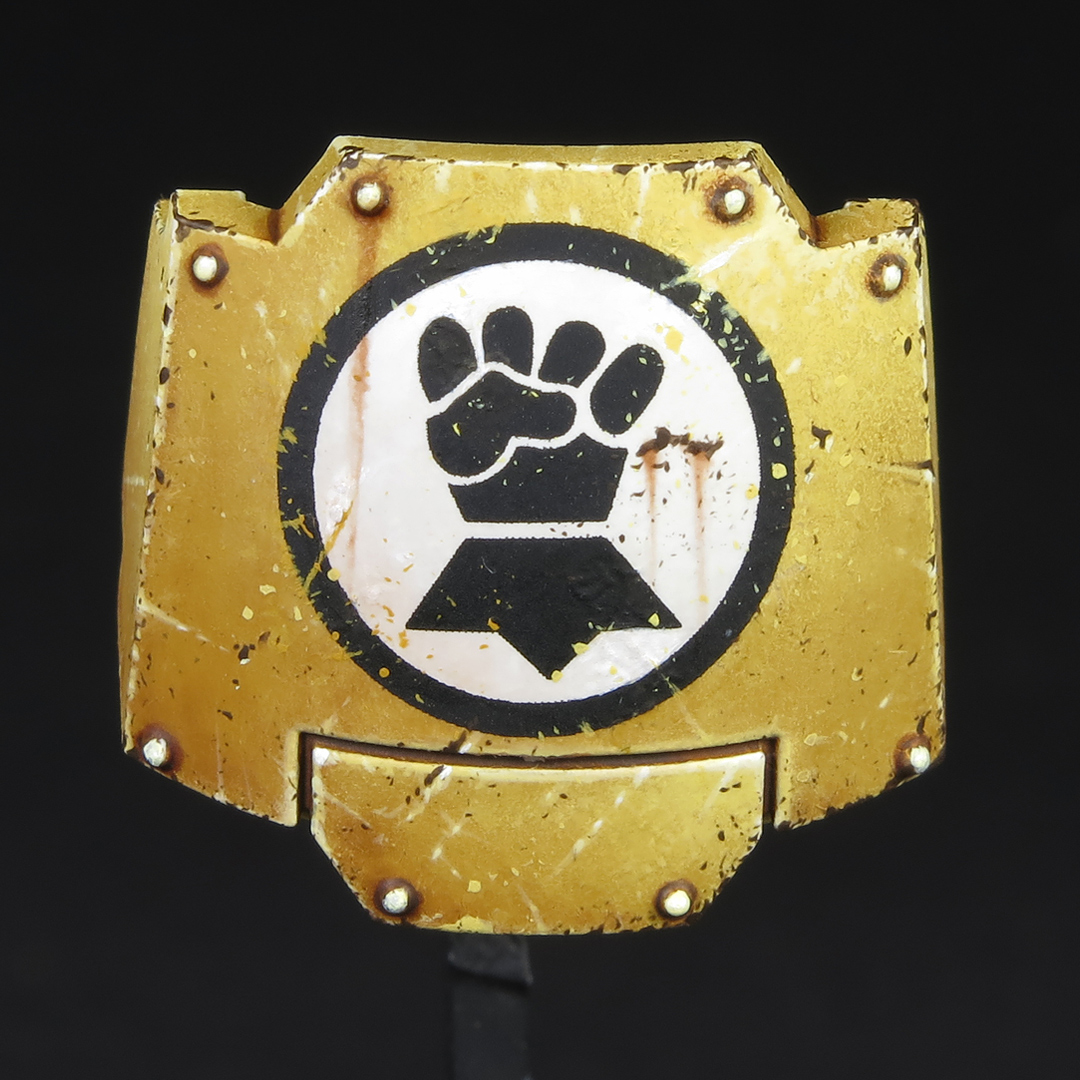
Also, wasn't sure when to do it, as I personally tend to apply them quite early during the painting process, but here I've applied the transfer before the overall weathering. Hopefully, that'll show how each of those steps can enhance the "painted on/part of the surface" look of the emblem.

I've applied the transfer (Imperial Fist symbol from the old GW sheet) over gloss varnish (Vallejo Mecha).
Once it was dry, I covered the area with Mr. Mark Softer (regular, NOT Neo) - a chemical that helps transfer to "sink" into the detail and copy the surface. You might need to do an additional Softer application, after poking the folds/air bubbles with sharp blade or needle. And always test the chemical solutions on a spare transfer from the sheet before doing the actual models.
Mr. Hobby also do a Set solution, which is supposed to be used instead of water during initial application. Micro Set & Sol are similar popular products of that nature.
I then sealed the detail with Vallejo Premium matte varnish. There are some folds still visible (lower right on black fist), due to age of the transfer and my mistake, but blemishes like that won't be as noticeable with weathering done next.

9. Sponge chipping. Can be done with both dark and light colors, used in previous steps - Heavy Goldbrown, Pale Yellow, Ice Yellow, Charred Brown.
A piece of sponge or foam is used to dab some chipping. Preparation of the sponge is similar to the brush for stippling - you want a nice light pattern. Some logic will be welcomed here, so think about what areas on the things you're painting will be exposed to potential damage. Edges of plates, boots, melee weapons & shields are good examples.
Area in and around the transfer gets chipped with underlying armor color. This might've been a bad example, as symbol is quite big, and white & yellow don't produce much contrast, but it works well when transfer and armor color are noticeably different.
You can then go in with the brush and enhance the effect with some manual chips, scratches and highlights.
In realism realm rivets would probably get chipped, but for contrast purposes they look better re-highlighted.
10. Streaks. Reikland Fleshshade + a touch of Glaze Medium and water.
Rivets and bigger chips are usually good visual choices for these. Can be done in two ways (in both the brush movement is downward, or towards yourself - to me it is the most natural way of doing straight lines):
Start->End. Apply some shade at the "origin" of eventual steak, clean the brush, and gently drag it down by decreasing the pressure on the brush.
End->Start. Turn the detail upside down and lightly "dot" in the streak, increasing the width by increasing the pressure on the brush.
Both will take a few passes to get the desired strength and shape. Let each one dry completely.
I also lightly glazed the bottom left corner of the symbol to give it a bit of color.
Paint choice is not limited to washes, and color choice is not limited to rusty tones, of course. Grime, verdigris, slime, blood can all look interesting with appropriate context.
Paint choice is not limited to washes, and color choice is not limited to rusty tones, of course. Grime, verdigris, slime, blood can all look interesting with appropriate context.

11. Pigments. Vallejo Burnt Sienna and Burnt Umber.
Great choice to tie model with the base is applying same pigments (aka weathering powders) on both.
Here I just dusted the bottom with browns, but pigments can also be applied as a wash - I prefer mixing with airbrush thinner for this.


Latter method works especially great for something like bike tires, as on these Ork Warbikers.
Pigments can be further sealed either
with special products, or simply by spraying a thin layer of varnish
(it will, to an extent, lessen the "dusty" look and amount of visible
powder). I find it to not be necessary in case of pigment + airbrush thinner wash method.
Other angles of the finished tutorial bit.

Some more color examples. Metallic schemes would be a breeze to do, as paint is quite forgiving to rougher transitions and takes weathering quite well. Not as fast as currently very popular "spray + wash" method, but the final look, in my opinion, is worth a bit of extra effort - you can easily incorporate some drybrushing & weathering into that.
And, as promised, here's how I've painted a Primaris Ultramarine, using stippling/drybrushing and a wash only.

Only difference with the main step-by-step tutorial process is that manual highlights got replaced with "overbrushing" and light sponge chipping (Step 4, clip below), and recess wash was done afterwards (Step 5).

Use an old natural-haired (I've found them to hold the shape better) old brush, don't remove as much paint as for drybrushing, and
just gently "glance" over the most prominent edges.
I've found "flattening" the brush during wiping helps with precision.

Colors used. Steps 3 & 4 are mixes of Heavy Blue & Off White, Step 5 is Nuln Oil with a touch of Rhinox Hide mix.
Ultimately, there's no ultimate "the best result for the least amount of effort" formula, as, after the fundamentals, it's all down to personal preference, both in final look and painting process used to achieve it. This step-by-step is meant to showcase the techniques in a comfortable (to me, at least) order, but it is up to you which ones and when to use. So, try things out and see what works for you.
Thanks for scrolling this far down and reading the guide, hope you'll find it useful.
Keep painting and have fun!