Hey folks!
In this guide I'll show how I've painted "molten metal"-style power
weapons as seen on Shadowkeepers Custodes models.
Original inspiration
and colors were found on
Instagram, but I did transitions "in reverse".
Real life example found on google, so potentially you can go as realistic as you wish with the scaling, OSL and such.
Example of the painted effect on Custodian Guard...
...and on weaponry of some Humongous Terminator Daddies.
Paints used.
General notes for the guide:
1. Wet palette is essential, as having colors (especially mixes)
available is convenient for smoothing out transitions, adding dots, etc.
- which can and will need to be done between each "color steps".
2. Glazing means putting thin film of color over the surface, stippling -
placing dots essentially.
3. When glazing, brush stroke needs to be done towards the area where
you want pigment to gather.
4. Leave the previous layer to dry completely! Moving "still drying"
layer around will cause peeling/texture build up issues. And, as paint
tends to darken after drying, chances are you might not even need
another layer.
5. For maximum contrast, light part of one plain should meet the dark of
the other (NMM-like), so plan out the transitions.
6. Unfortunately, I can't give the exact paint consistency used at given
step, as I do the painting fluidly and adjust consistency and
application method on a whim depending on what needs to be done.
And a disclaimer - taking good pictures of light colors with zooming
required to see the details proved to be difficult, so apologies if some
steps appear blurry/washed out/overexposed.
0. Orruk choppy thing is our tutorial bit. Primed with grey.
1. Basecoat, Golden Yellow. Took about 6-8 thin layers, not even joking.
2.1. First glaze/stipple pass with
Light Orange.
Try to make it as faint as possible, you don't want to
immediately ruin a pristine "eight thin coats" basecoating job.
2.2. Second pass.
Idea is to establish a transition from G.Y. and have
decent coverage for further transition into subsequent color. You can
apply a (relatively) thicker "film" and actually move the pigment around
by "stippling" with a (clean and slightly damp) brush - somewhat
similar to feathering. Don't be afraid of tide marks, as, if small
enough, they actually add to the textured effect.
2.3. Third pass. Mainly to have good coverage at the back, and correct the transition if needed.
3.1 Same as before, but using Scarlet.
This is the look after two
passes. As paint is darker and more opaque, consistency needs to be
thinner and application more sparing.
3.2. Third-fourth passes.
You'll probably be able to see areas that
you'd like to touch up, so some areas require less passes, and vice
versa.
4.1. First pass with Burnt Red.
Easiest to screw up step. As paint is
even darker and more opaque, hopefully you get the idea about "thinner"
and "more sparing". You can actually see "tide marks" on the left, which
mainly results from paint being too thin.
4.2. Second pass, mainly on the biggest "plain" to darken the back of the transition.
5. Black.
Basically the same as Burnt Red, but area is naturally smaller and application isn't required in some places.
6.1. Ice Yellow (who doesn't love a bit of paint name irony)
glazed/stippled highlight.
Arguably the easiest step, as yellow colors
are quite close and area is small.
6.2. Ice Yellow edge highlight.
Use the edge of the brush where
possible, otherwise (mostly in the center ridges) I prefer
stippling/dotting motion along the line. You can also draw a scratch
here and there to add some interest.
7. Off White edge highlight.
Pretty much the same as previous step, but done on smaller area.
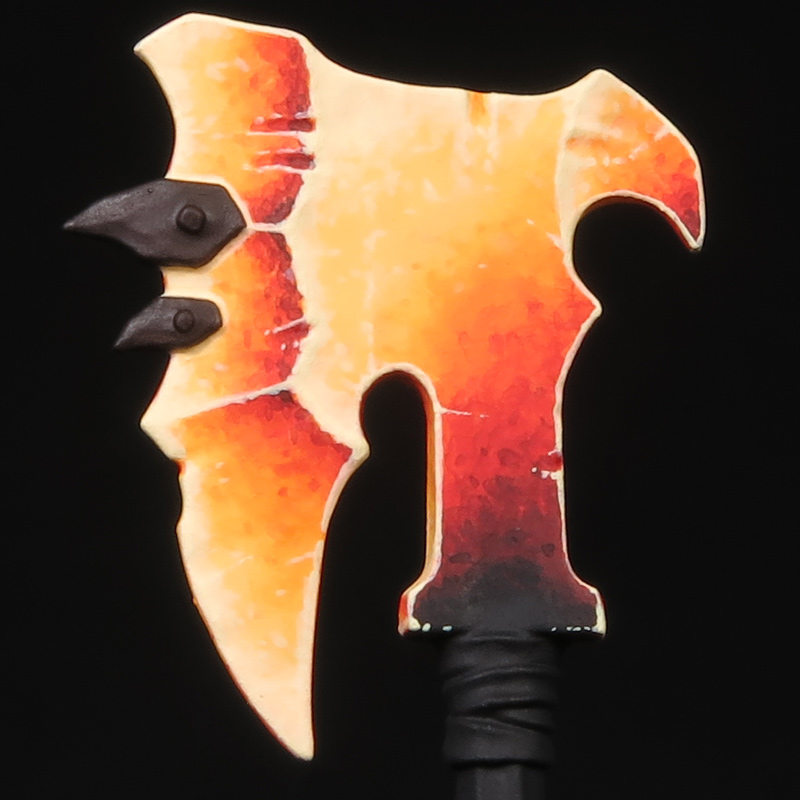
8.1. Done.
Bolted bits can be painted however you desire, I chose bronze with a bit of patina to add some contrast.
8.2. Done, but the other side. Yes, I painted it too for good measure.
That brings an obvious tip - paint both sides (and weapons on all models, if you're batch painting) at the same time, that'll help the paint job to look a bit more consistent.
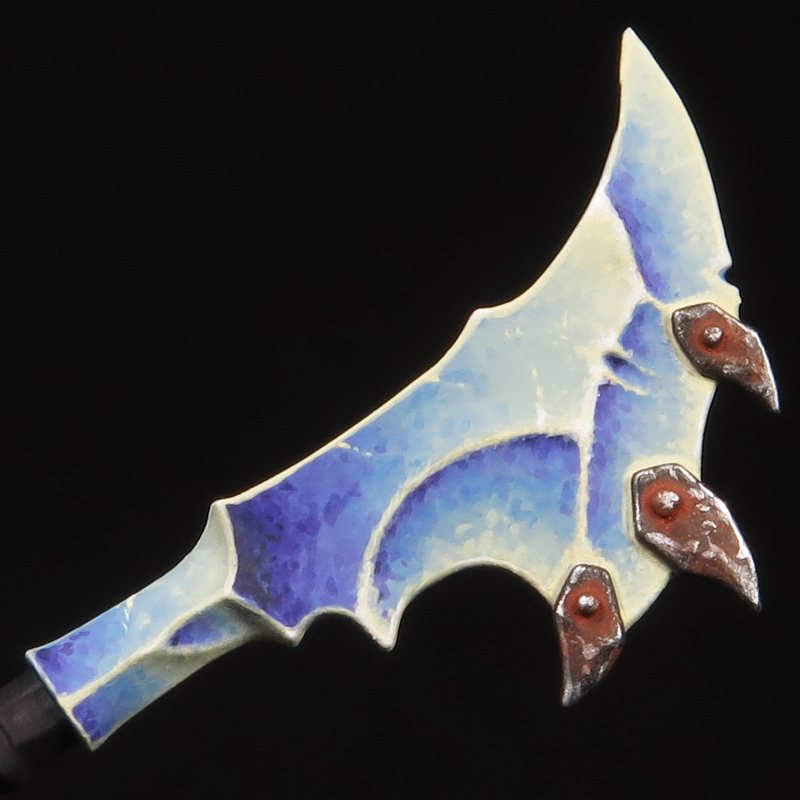
9.1. Example of how you can use different colors with the method.
Notice
how bolted bits are metal with rust to, again, provide some contrast.
9.2. The other side.
Thank you for checking the guide out! Hope you'll find it useful.
Keep painting and have fun!